Soil Testing — Digging Deeper
Discover what is Soil Testing and Why it Matters
Introduction
Soil is our most valuable resource in agriculture. What lies beneath our feet, how it behaves, and what its characteristics are determine how we can use it and how we can manipulate it to improve agricultural outcomes. Our soil supports our ability to grow crops and raise livestock. It also plays a crucial role in whether and how we fix carbon from an increasingly hostile atmosphere. This carbon, if fixed in our soil can be a benefit to its functioning as well as a benefit to the wider world in removing this CO2 from the air around us.
With this in mind, it is vital to understand the soils we are working with, their limitations, and how we can rebalance or manipulate them to achieve the best outcomes. In this blog post, we will take an in-depth look at soil testing for agricultural systems, why testing is essential, the best methods, and how to apply the data to achieve desired outcomes. We will also provide a step-by-step guide on how to get started if you are new to soil testing.
What is Soil Testing and Why it Matters
A soil test is a detailed analysis of the physical, chemical, and biological properties of soil. It helps growers understand the nutrient profile, pH levels, organic matter content, and other factors that influence soil fertility and crop productivity. By identifying the soil’s characteristics, a soil test informs decisions about fertilisers, amendments, irrigation, and cropping strategies. This ensures optimal crop growth, cost-effective management, and minimal environmental impact.
Levels of Details in Soil Testing
Basic Tests:
- pH Levels: Measures soil acidity or alkalinity, critical for nutrient availability.
- Macronutrient Levels: Determines nitrogen (N), phosphorus (P), and potassium (K) concentrations—essential for plant growth.
These tests are simple but relatively affordable. They cover the key factors influencing soil fertility and its capacity to grow crops or support livestock in pasture systems. However, there are many nuances behind these basic metrics. To understand what drives the data, a more detailed test is often necessary.
Intermediate Tests:
- Cation Exchange Capacity (CEC): Indicates the soil’s ability to hold and exchange nutrients.
- Base Saturation Ratios: Evaluates the balance of calcium, magnesium, potassium, and sodium.
- Organic Matter Content: Assesses soil health and fertility potential.
Intermediate tests provide deeper insight into soil structure and the balance of major cations. A soil’s CEC and its base saturation ratios give professionals a clearer idea of whether the soil will infiltrate or retain water, how well it aggregates, and whether it has adequate air pockets for gas exchange, critical for maintaining a healthy microbial community in the soil. The Organic Matter (or Organic Carbon) metric is a basic indicator of soil health, reflecting how well the microbial population below the surface is thriving.
Comprehensive Tests:
- Micronutrient Analysis: Includes elements like boron, zinc, copper, and manganese.
- Soil Texture: Determines proportions of sand, silt, and clay, affecting drainage and aeration.
- Biological Activity: Measures microbial populations and activity, indicating soil health.
- Heavy Metal Testing: Identifies contaminants like lead or cadmium.
Comprehensive tests offer the most well-balanced, full overview of the soil in its entirety. In addition to covering all the metrics from basic and intermediate tests, they assess minor elements and biological activity. By understanding these factors and managing them correctly, trained professionals can better understand soil behavior and use the data to manage it for best outcomes.
Laboratories often specialise in either physical soil testing (focusing on base saturations and the soil’s ionic make-up) or biological soil testing (testing the microbial species in the soil's microbiome). Samples for these tests are typically separated and sent to leading organisations specialising in each area of expertise. The data is then compiled and presented once the results are received.
Soil Composition and How it Dictates Behaviour and Management
Soil’s physical and chemical properties directly influence how it behaves and what it can produce:
Nutrient Availability
The balance of macro- and micronutrients determines whether crops will thrive or suffer deficiencies. For example, low nitrogen levels in a soil test may indicate that non-leguminous crops like wheat require nitrogen fertilisation for optimal growth.
Water Retention and Drainage
Soils with high clay content retain more nutrients but can cause waterlogging if not properly balanced. Sandy soils drain well but require more frequent fertilisation due to nutrient leaching. Organic matter helps reduce water loss in sandy soils while improving water and nutrient retention.
Amendments and Fertilisation
Imbalances in soil nutrients (e.g., high sodium) require targeted amendments to prevent nutrient antagonism. These amendments can be applied directly to the soil or in smaller doses to the crop as foliar nutrition. When soil cycles nutrients effectively and maintains an active, functional microbiome, the need for fertilisation diminishes.
Crop Suitability
Specific crops require certain nutrient profiles. For example, phosphorus-rich soils make it a suitable growing system for phosphorus-intensive crops like legumes. Some crops, however, struggle in acidic conditions such as Faba Beans.
In Summary
A soil test is more than just data, it’s a roadmap for efficient and sustainable land management. Your soil’s nutrient profile reflects its past use and informs its future potential. By understanding the interactions between nutrients, organic matter, and physical properties, you can tailor management practices to maximise yields, reduce costs, and maintain soil health for future generations.
The History of Soil Testing
Soil testing has evolved significantly over centuries, driven by humanity’s need to understand and manage soil for agricultural productivity. The origins of soil science can be traced back to the early 19th century when scientists began exploring the chemical composition of soil and its relationship to plant growth. German chemist Justus von Liebig (1803–1873) is often credited as the “father of agricultural chemistry.” Liebig’s work in the 1840s laid the foundation for understanding nutrient cycling, particularly his theory that plants derive essential nutrients from the soil in specific forms. This revolutionised the perception of soil fertility and marked the beginning of analytical soil testing.
The early 20th century saw the refinement of soil testing methodologies, with researchers recognising the importance of soil pH and nutrient availability. In the United States, William Albrecht (1888–1974), a soil scientist at the University of Missouri, played a pivotal role in advancing the concept of base saturation and its impact on soil fertility. Albrecht emphasised the importance of balancing calcium, magnesium, potassium, and other cations for optimal soil health. His research highlighted how soil chemistry influences biological activity and plant nutrient uptake, forming the basis for modern soil tests that include cation exchange capacity (CEC) and base saturation ratios.
The mid-20th century witnessed the integration of biological testing alongside chemical methods. Soil microbiology gained prominence, with scientists like Selman Waksman discovering the role of microbes in nutrient cycling and organic matter decomposition. This expanded soil testing to include assessments of organic carbon and microbial activity—critical for sustainable farming.
In recent decades, soil testing has been revolutionised by advancements in technology. Sophisticated laboratory techniques, such as inductively coupled plasma (ICP) spectroscopy, allow precise measurement of micronutrients and trace elements. Digital tools and data analytics now provide farmers with actionable insights, ensuring precision agriculture tailored to specific soil conditions.
The contributions of pioneers like Liebig, Albrecht, and Waksman have made soil testing an indispensable tool for modern agriculture, bridging the gap between soil science and practical land management.
For a more in-depth and extensive history of soil testing, visit: ACS Publications.
Understanding the Benefits and Avoiding the Pitfalls
Soil testing is vital for laying down a management plan and getting the best return on your operation. However, there are a few traps worth avoiding. These challenges can vary depending on your farming system, but understanding them helps you make the most of your soil data.
Accurate Testing
Soils can vary substantially within a very small area. If the soil type you are testing changes over the distance you are sampling, the results will fall somewhere between the two different soil types and will not be an accurate representation of either. There are ways to work around this. Farmers know where their soil changes, so if you, as the farmer, can clearly show the sampler where the soils shift, such as where the red loam turns to grey clay, they can test one soil type at a time. If the land is new and you do not know the distribution of soil types, you can use EM mapping or, more simply, yield mapping to identify zones and test them accordingly.
Accurate Analysis of the Data
It is very important, especially if you are paying significant amounts to have your farm mapped and tested, that you receive the right expert advice to act on the data. Different advisors use different testing metrics and have varying levels of expertise in analysing the data their chosen tests provide. There are often nuances in how data is extracted, graphed, and presented, so it is essential that the advisor you work with can interpret the data correctly and provide sound recommendations. While all data can be useful for making management decisions, its value depends on accurate interpretation. With solid advice, you can use the data to streamline your operation and maximise your ROI.
When done right it is a game changer
The soils beneath our feet vary massively across the world, shaped by their physical, chemical, and biological properties. Our management strategies should be just as diverse as the soils themselves. How can you effectively manage a soil if you do not know exactly what is in it and how it is structured? That is why extensive, in-depth, and accurately collected soil data, coupled with competent, expert advice, is a must-have for any farm aiming to achieve positive outcomes and improve ROI.
How to Soil Test
It is essential that the samples collected are taken accurately and reflect the area being tested for laboratory analysis and subsequent interpretation to be fully effective.
Where to Sample
For sample considerations, it is sensible to collect the least number of samples that will reflect the nutrient status of an area being tested. However, it is ideal to divide the area up according to any of the following considerations.
- Soil type
- Land use
- Crop variety
- Topography
- Fertiliser history
- Healthy vs. unhealthy areas
Broadacre
Soil testing for broadacre agriculture begins with zoning the field into areas of similar soil type or productivity. This can be achieved using EM (Electromagnetic) mapping or analysing yield maps from previous harvests. These tools identify variability in soil properties, allowing for the creation of management zones. Once zones are defined, select a representative transect within each zone that crosses the predominant soil type. Mark GPS points along the transect to enable repeat sampling for consistent long-term monitoring.
For testing the top 15 cm of soil, use a soil probe or auger to collect samples. Begin at one end of the transect and take a sample at each predetermined GPS point. Ensure samples are collected at a uniform depth to maintain consistency. It is crucial that transects remain specific to a single management zone or soil type to protect the integrity of the data.
Combine the samples from all points along the sampled transect into a bucket. Thoroughly mix the soil to create a composite sample representing the entire transect. After mixing, place approximately 500 g of soil into a labelled soil test bag, noting the zone and GPS coordinates. Repeat the process for other zones.
Send the samples to an accredited soil laboratory for analysis. Standard tests will include pH, nutrient levels (e.g., N, P, K), and organic carbon, while more comprehensive tests will provide deeper insights into soil behaviour, allowing for more tailored recommendations. By revisiting the same GPS-marked transects in subsequent seasons, you can track changes in soil properties and refine your management practices accordingly.
This systematic approach ensures accuracy and repeatability, providing the data needed for precision agriculture.
Horticulture
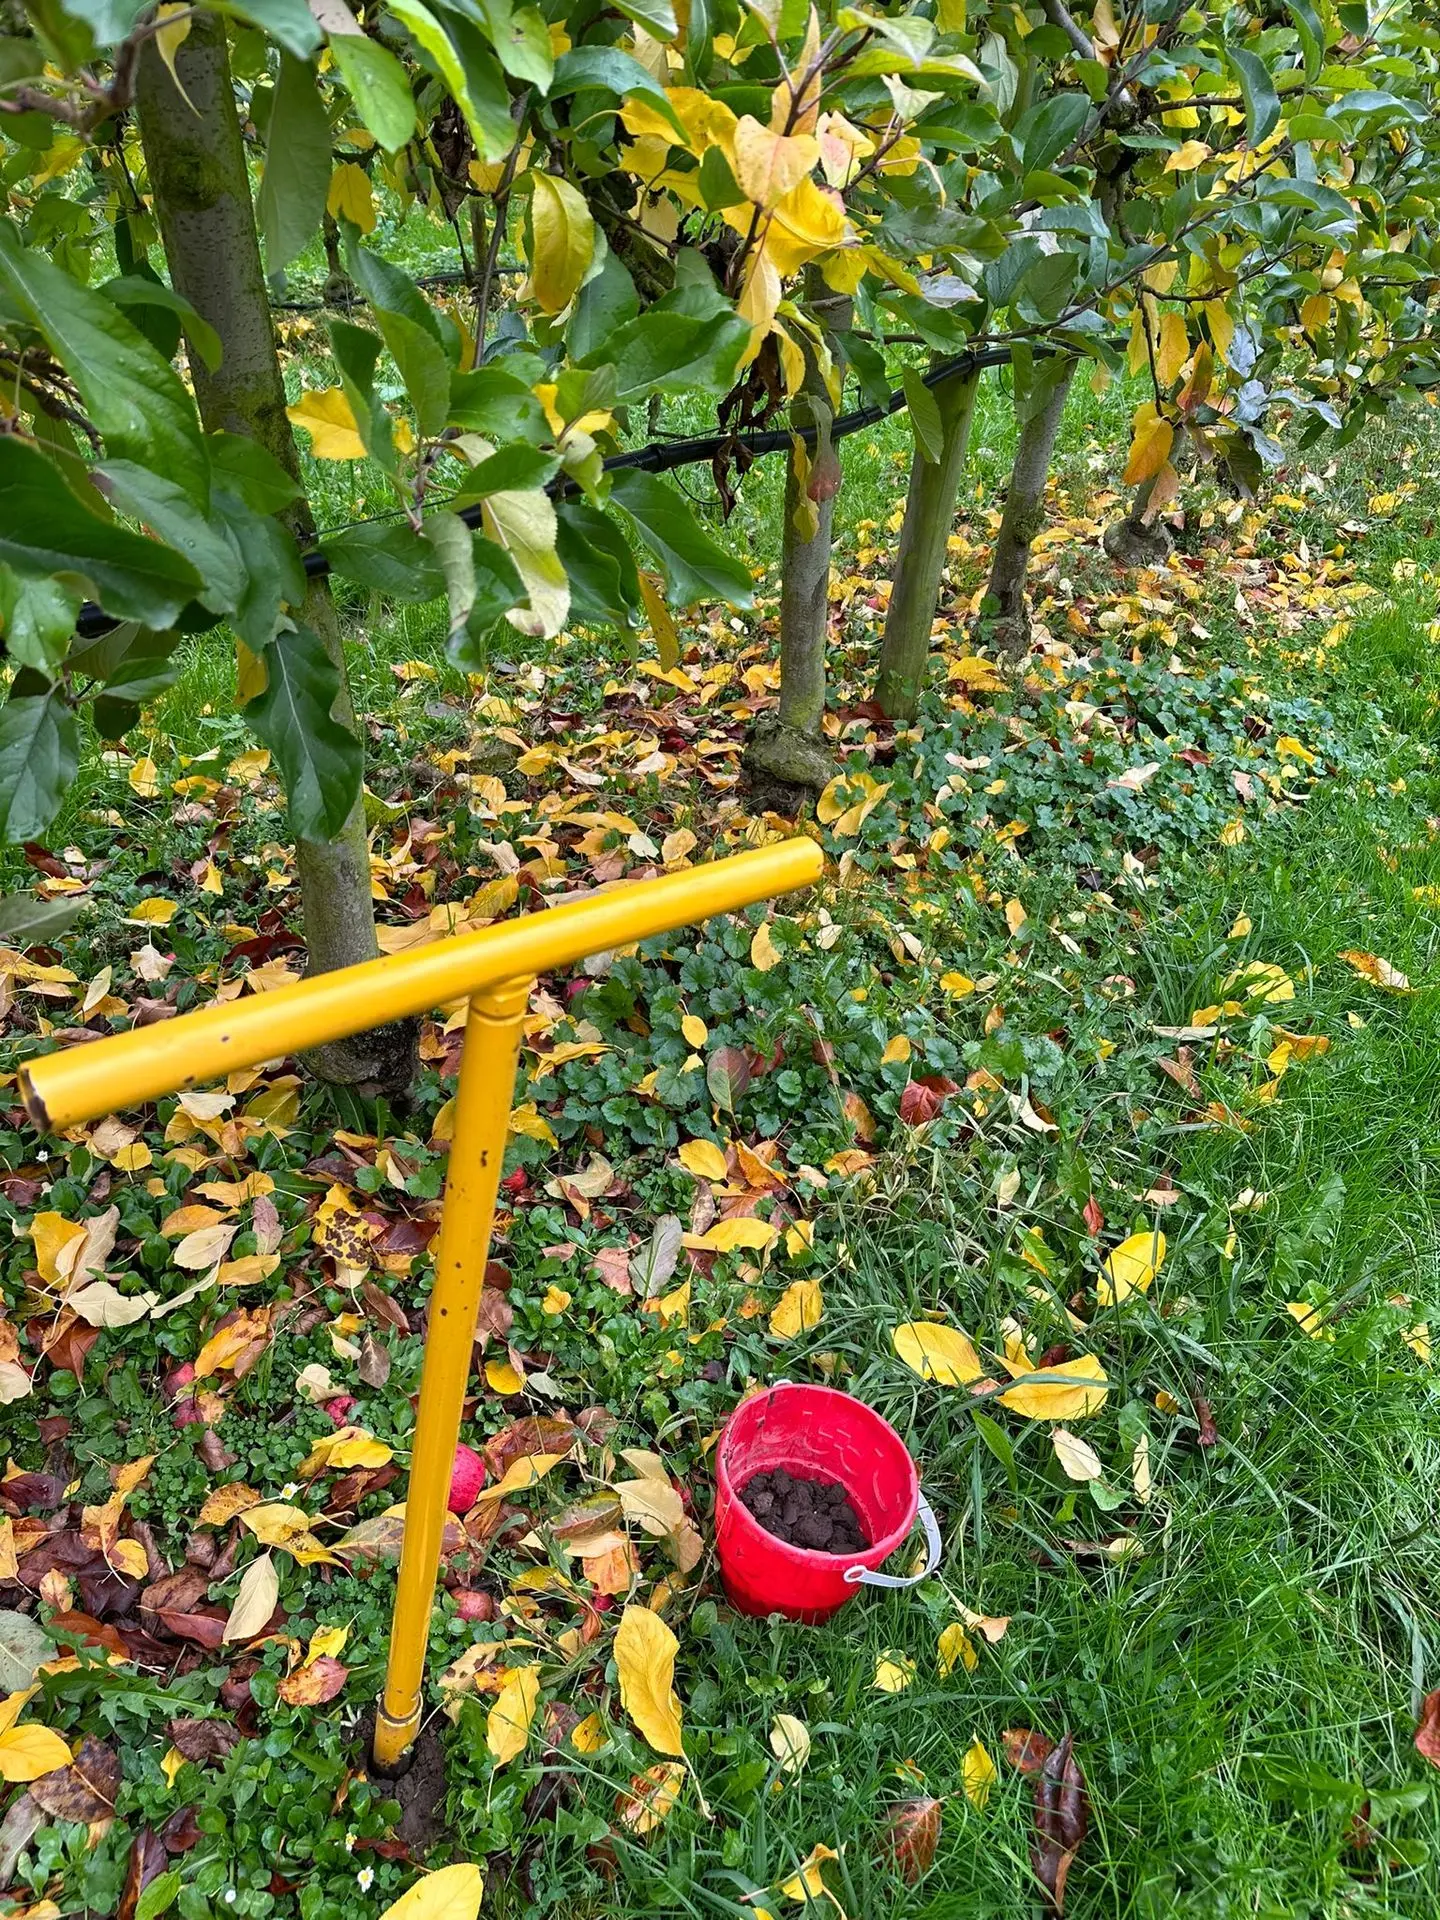
The most effective tools for soil sampling are a soil probe or auger, as they provide the most accurate and consistent samples. These tools are readily available for purchase from various online stores. While a spade or trowel can be used, it is crucial to avoid taking wedge-shaped samples, as this will distort the results.
When sampling, avoid areas that do not reflect the typical soil conditions of the field. This includes sites near dung and urine patches, fences, tracks, troughs, gateways, trees, or any other anomalies. Do not sample within two months of applying fertiliser, lime, or gypsum, and avoid sampling waterlogged soil, as these factors can skew the data.
To collect a representative sample:
- Take a minimum of 25 cores from across the selected area using a zigzag pattern.
- Place the cores into a clean plastic bucket and thoroughly mix them to create a composite sample.
- Fill one of the supplied sample bags three-quarters full with the mixed soil.
- Complete the sample data sheet immediately at the time of sampling and insert it into the designated paperwork pouch.
- Post the samples as soon as possible, as soil can incubate in the bag, potentially altering the levels of plant-available nutrients.
Sampling Depth and Patterns for Orchards and Vineyards
Select a reference row within the block. Collect 15–20 cores, each 150 mm deep, from the root zone of the trees or vines in an alternating pattern. Avoid sampling outside the irrigation drip zone, near boundary rows, or along wheel tracks.
Choosing a consistent reference row allows for year-on-year replicable sampling, ensuring future soil test data accurately reflects any changes in soil health over time.
By following these steps, you can gather high-quality soil samples that provide reliable data for making informed land management decisions.
Examples of Soil Testing
Comprehensive Soil Test

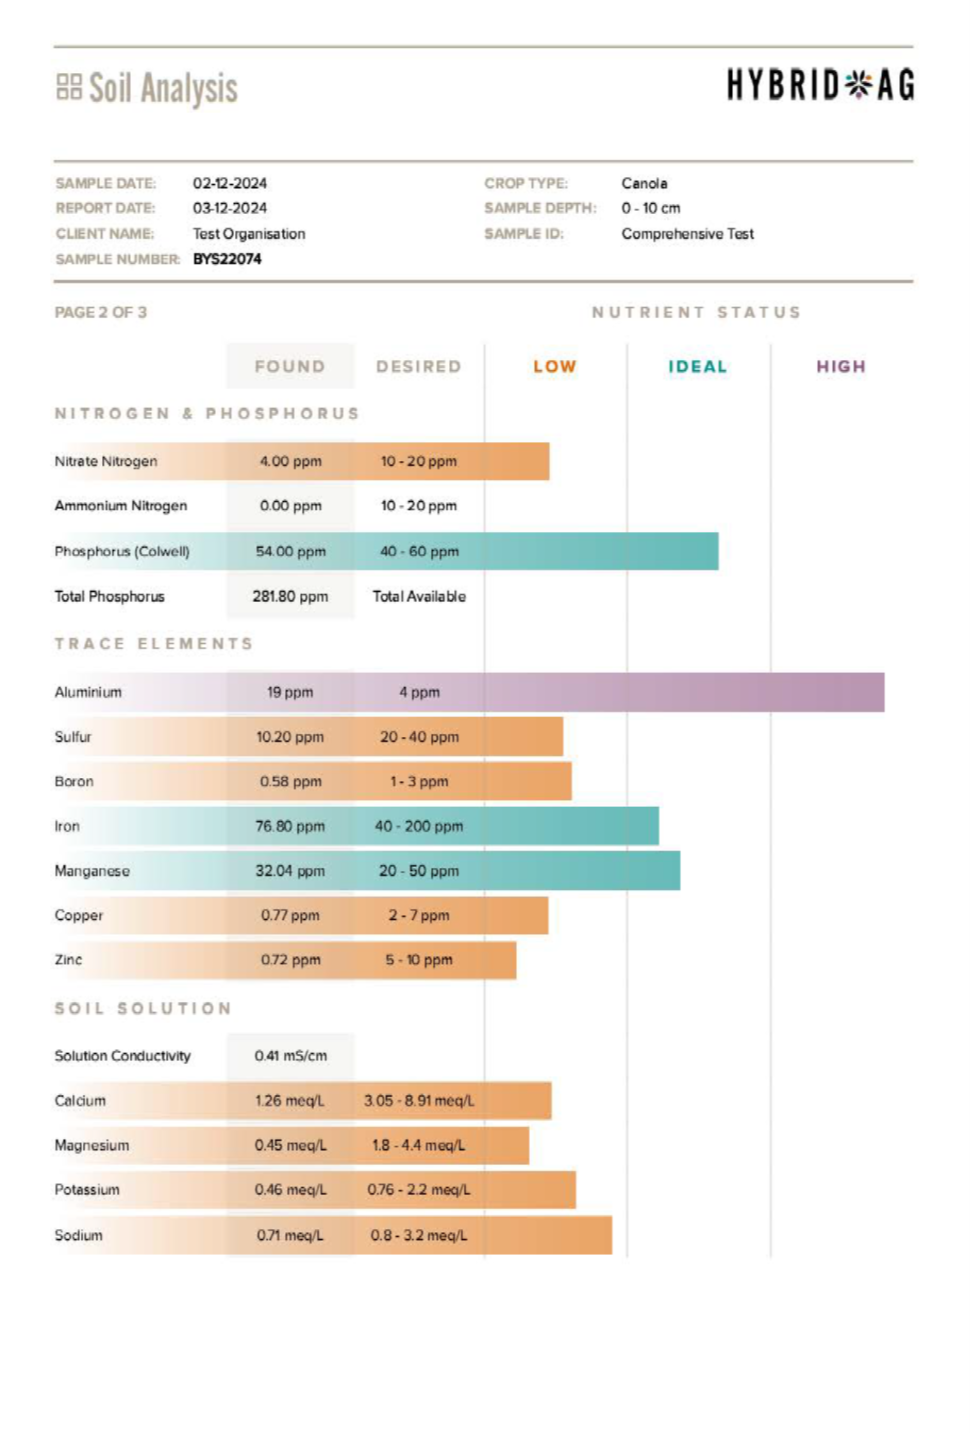
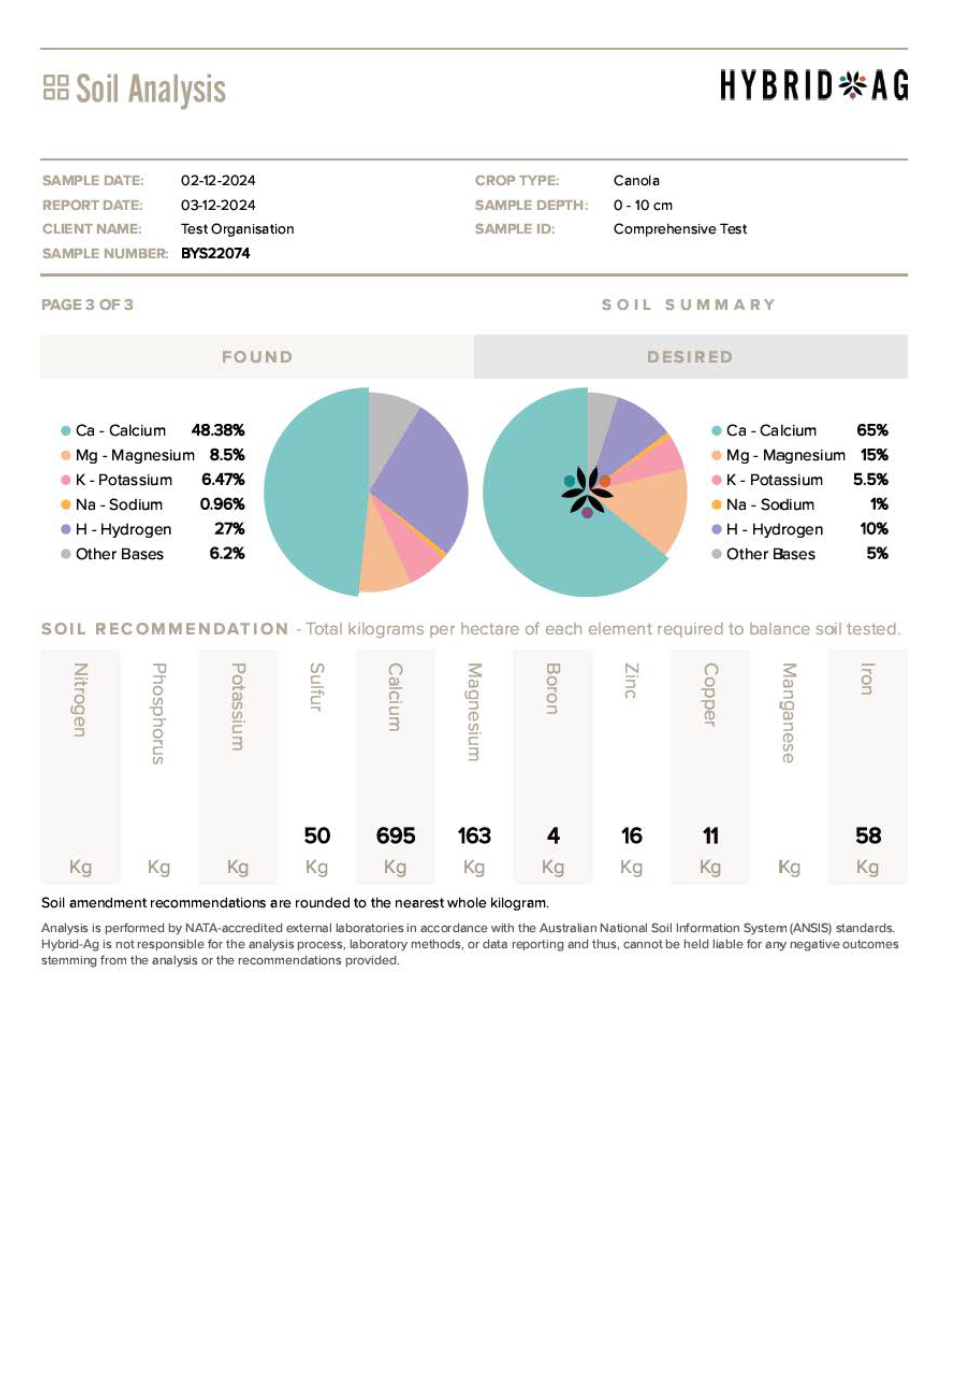
The soil test above is a comprehensive test taken off a broadacre cropping paddock in Northeast Victoria in Australia’s Wheat Belt. This test contains all the metrics for a basic and intermediate test as well as measurements for some trace minerals and a look into the soil soluble nutrients in the system tested. This test layout goes on to show number of Kgs/Ha of each nutrient that would need to be applied to this soil to return the balance of the base saturation and trace minerals back to optimum. Optimums in this example are calculated using William Albrecht’s base saturation optimums given the soils CEC and TEC (Cation and Total Exchange Capacities). What this test doesn’t delve into is the microbial balance of this soil although there are some metrics in the Physical and Chemical test presented above that will suggest the biological activity in this soil.
Unlock Your Soil's Potential
Take the first step toward unlocking your soil’s potential by investing in comprehensive soil testing. Whether you’re managing crops or pasture, understanding your soil’s unique composition is key to making informed decisions that boost productivity, reduce costs, and enhance sustainability. Don’t leave your success to chance. Identify nutrient imbalances, improve soil health, and maximise your ROI with expert analysis and targeted management. Consult your local agronomist or soil testing laboratory today to create a tailored plan for your farm. Healthy soil is the foundation of agricultural success. Start digging deeper for a better tomorrow.
1. Brady, N. C., & Weil, R. R. (2017). The Nature and Properties of Soils (15th ed.). Pearson Education.
• Explains soil properties, CEC, pH, and nutrient availability.
2. Hazelton, P., & Murphy, B. (2016). Interpreting Soil Test Results: What Do All the Numbers Mean? (3rd ed.). CSIRO Publishing.
• Details interpreting soil tests, including macronutrients, micronutrients, and soil health indicators.
3. Marschner, H. (2012). Marschner’s Mineral Nutrition of Higher Plants (3rd ed.). Academic Press.
• Discusses the role of macro- and micronutrients in plant physiology.
4. Australian Government – National Soil Information System (NSIS).
• Provides standards for soil testing in Australia.
• https://www.agriculture.gov.au
5. McKenzie, N., Grundy, M., Webster, R., & Ringrose-Voase, A. (2008). Guidelines for Surveying Soil and Land Resources (2nd ed.). CSIRO Publishing.
• Outlines soil survey techniques and interpretation methods.
6. Soil Quality Pty Ltd. (n.d.). Soil Health Indicators and Management.
• Highlights organic carbon, electrical conductivity, and microbial activity in soil assessment.
• https://www.soilquality.org.au
7. Fertilizer Australia. (2023). Nutrient Management Guidelines for Australian Soils.
• Guides nutrient application based on soil test results.
• https://fertilizer.org.au
8. Hybrid-Ag Pty Ltd. (2024). Soil Analysis Report for Pivot Good Ground.
9. Brady, N. C., & Weil, R. R. (2017). The Nature and Properties of Soils (15th ed.). Pearson Education.
10. Hazelton, P., & Murphy, B. (2016). Interpreting Soil Test Results: What Do All the Numbers Mean? (3rd ed.). CSIRO Publishing.
11. Liebig, J. (1840). Organic Chemistry in Its Applications to Agriculture and Physiology. Taylor and Walton.
12. Albrecht, W. (1957). Soil Fertility and Animal Health. Acres USA.
13. Waksman, S. A. (1941). The Soil and the Microbe. Wiley.